Getting Started
Get the Source Code
Clone the repository:
git clone https://github.com/polifonia-project/dashboard.git
Set Up the Environment
- Python3 should be installed properly in the workstation. If you are not sure if Python is properly installed, please open a terminal and type python --version.
- Enter the project folder using the terminal/powershell/bash.
- Install modules using a Virtual Environment.
MacOS/Linux:
$ cd myproject

                                        $ python3 -m venv venv

                                        $ . venv/bin/activate
Windows:
> cd myproject

                                        > python3 -m venv venv

                                        > venv\Scripts\activate
Install Requirements
To automatically install all the libraries that are requested for the the application, simply run:
pip3 install -r requirements.txt
Run the Application
bash:
$ export FLASK_APP=app

                                        $ flask run
CMD:
> set FLASK_APP=app

                                        > flask run
Powershell:
> $env:FLASK_APP = "app"

                                        > flask run
Running at http://127.0.0.1:5000/melody.
Before running the application, follow the instruction to setup the authentication.
Authentication
Preparation checklist
- get a GitHub account
- create a bearer token bind to your account
- create a repository
- create a OAuth application paired with your repository
MELODY has a tight-knit relation with GitHub. To use MELODY locally or in a production environment, your instance must be paired with a GitHub repository and an OAuth Application for the authentication (see how to create an OAuth app connected to your instance of MELODY and how to approve the app on your repository).
The benefit of having a repository attached to your instance is that only collaborators of the repository can sign in with their GitHub account and publish a story on the online MELODY website, which will appear in the left sidebar. While configuring the OAuth Application for your local instance, use the following settings:
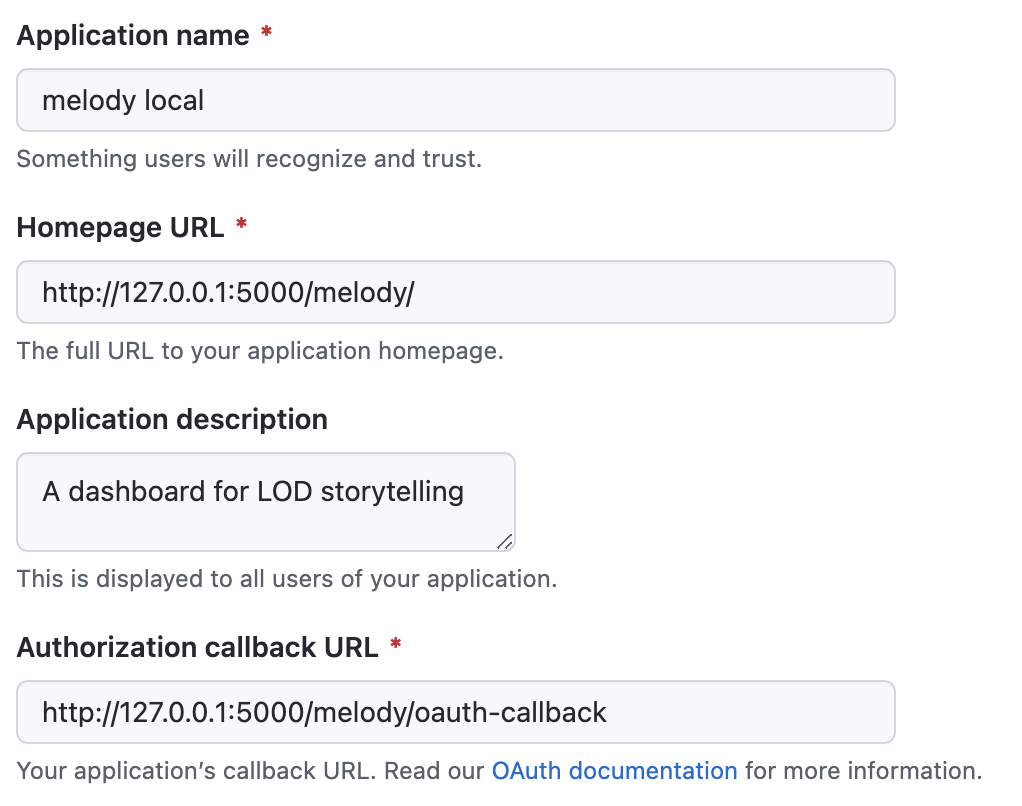
If you are deploying MELODY online, replace localhost with your URL base, but keep /melody endpoint.
Configuration
After creating the OAuth app, you will get a Client ID and a CLient secret ID. Modify the file conf.py in the root directory, and include the codes to configure the login.
        clientID='OAUth client id'
        clientSecret='OAUth client secret id'
        owner='the owner of the repository, e.g. your username'
        repo_name='the repository name'
        token='the bearer token of the admin of the repository'
Allow external collaborators (optional)
If you want to allow external collaborators to create stories too, but you don't want their stories to be published with yours, you can create another online environment dedicated to them, where external users' stories are published. To do so, you will need:
- another GitHub repository with Github Pages enabled
- a bearer token
- copy the static folder in the new repository
- add a few parameters to the configuration file on your instance of MELODY
        melody_owner = 'the owner of the repository where external users can publish stories'
        melody_repo_name = 'the name of the repository where external users can publish stories'
        melody_sub_dir = 'the folder or path in the repository where external stories will be stored (NB. paste here the folder "static")'
        melody_token = 'the bearer token of the admin of the repository'
        gituser = 'the name of the github user that will push commits on behalf of external users'
        email = 'the email of the github user that will push commits'
The github user may be the same as the one you used for MELODY or may be different. Note that this user will be the one asking users permissions to read their contact info (for the only purpose to understand whether they are MELODY collaborators or external users). While we preserve the username and email of stories creators, the commits and publication of stories are managed by the user you choose (i.e. gituser | email, who can be the same as melody_owner and/or owner).